Category: Clinical Skills
Tags: Clinical Examination, Head-to-Toe Assessment, Physical Examination, Nursing Assessment, Medical Students, Patient Assessment, Clinical Skills
Introduction
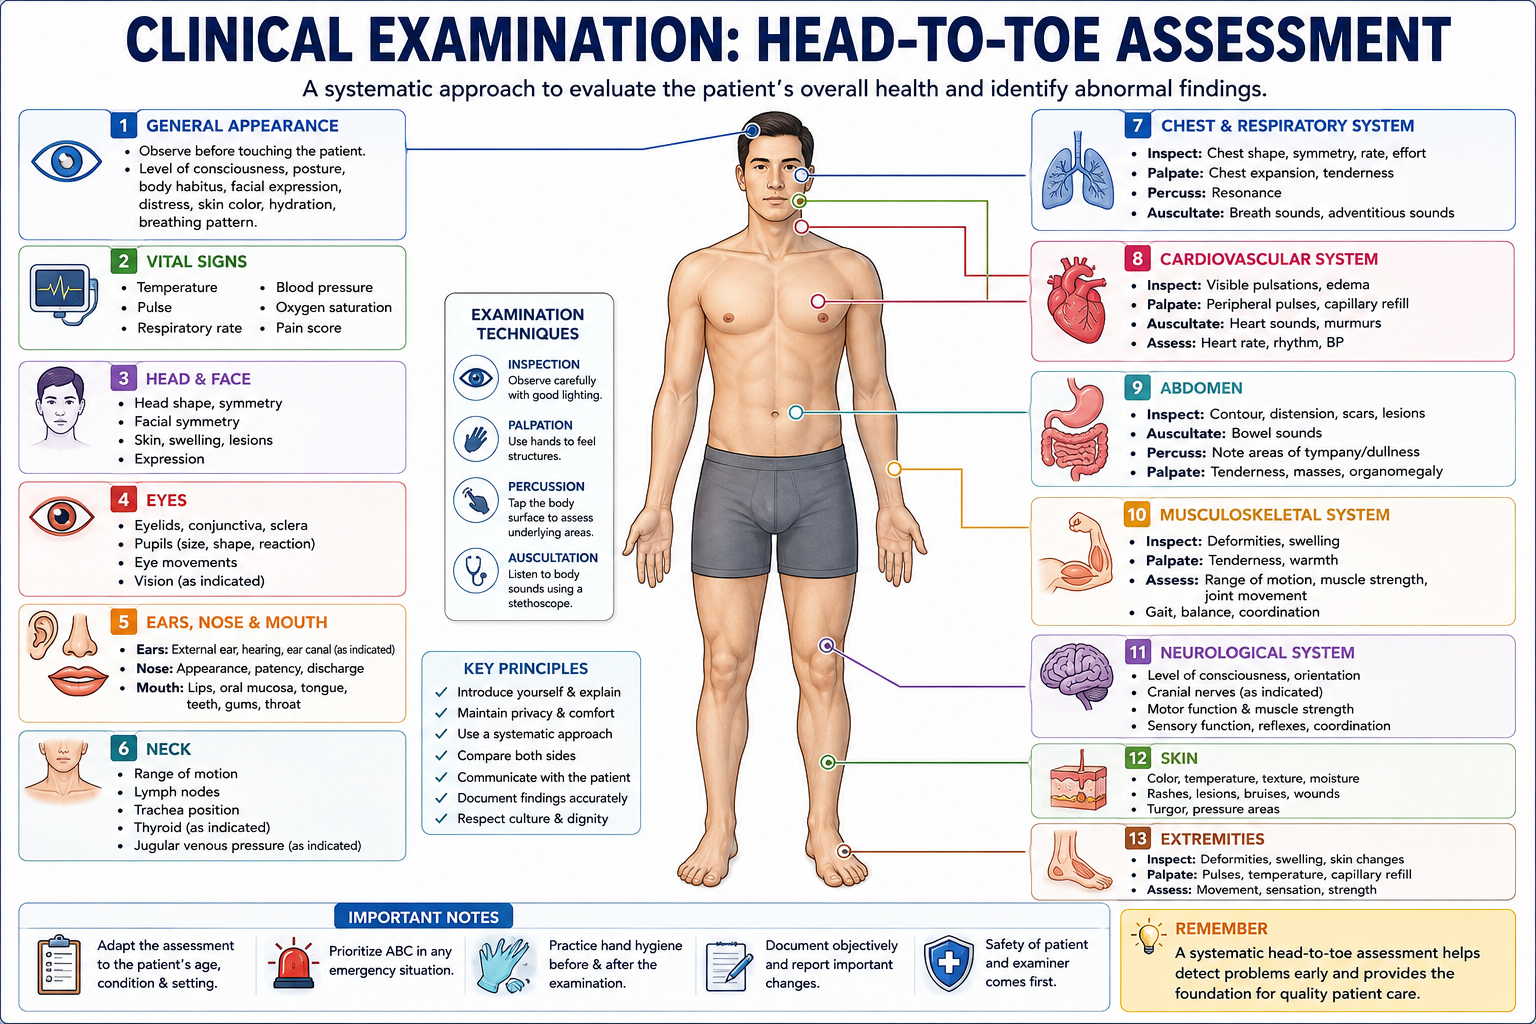
A head-to-toe assessment is a systematic physical examination used by healthcare professionals to evaluate a patient’s overall health and identify abnormal findings.
Instead of examining the patient randomly, the healthcare professional follows a structured sequence from the head down to the feet. This approach helps ensure that important body systems are assessed and that findings are documented consistently.
For medical and nursing students, learning a systematic head-to-toe assessment is an important foundation for developing clinical examination skills.
What Is a Head-to-Toe Assessment?
A head-to-toe assessment is a comprehensive physical examination in which the healthcare professional evaluates the patient systematically.
Depending on the clinical situation, the assessment may include:
- General appearance
- Vital signs
- Head and face
- Eyes and ears
- Nose and mouth
- Neck
- Chest and respiratory system
- Cardiovascular system
- Abdomen
- Musculoskeletal system
- Neurological status
- Skin
- Extremities
The exact examination can vary depending on the patient’s condition, age, symptoms, and clinical setting.
1. Preparation Before the Examination
Before beginning the assessment, proper preparation is important.
Introduce Yourself
Introduce yourself to the patient and explain what you are going to do.
Confirm Patient Identity
Use the appropriate patient-identification process according to the healthcare facility’s protocol.
Explain the Examination
Explain the purpose and general steps of the examination in language the patient can understand.
Hand Hygiene
Perform appropriate hand hygiene before and after patient contact.
Privacy and Comfort
Ensure appropriate privacy, lighting, positioning, and exposure only of the body areas necessary for the examination.
2. General Appearance
Begin by observing the patient before performing the detailed physical examination.
Look at:
- Level of consciousness
- General appearance
- Posture
- Body position
- Mobility
- Facial expression
- Skin color
- Apparent distress
- Breathing pattern
- Communication ability
This initial observation can provide important clues about the patient’s condition.
3. Vital Signs
Vital signs provide basic information about the patient’s physiological status.
Depending on the clinical situation, assess:
- Temperature
- Pulse
- Respiratory rate
- Blood pressure
- Oxygen saturation
Pain assessment may also be included where appropriate.
Abnormal vital signs should be interpreted together with the patient’s symptoms and other examination findings.
4. Head and Face
Examine the head and face for obvious abnormalities.
Assess:
- Head shape and symmetry
- Facial symmetry
- Facial movements
- Skin condition
- Swelling
- Visible lesions
Observe whether the patient appears comfortable and whether facial movements are symmetrical.
5. Eyes
The eye examination may include observation of:
- Eyelids
- Conjunctiva
- Sclera
- Pupils
- Eye movements
- Vision, when clinically indicated
Pupillary Assessment
Observe pupil size, symmetry, and reaction to light when appropriate.
Abnormal pupil findings may require further neurological or ophthalmic assessment.
6. Ears, Nose, and Mouth
Ears
Assess the external ears and, when indicated, hearing and the ear canal or tympanic membrane.
Nose
Observe:
- Nasal appearance
- Nasal passages
- Discharge
- Congestion
- Breathing through the nose
Mouth
Assess:
- Lips
- Oral mucosa
- Tongue
- Teeth
- Gums
- Throat
Look for abnormalities such as lesions, swelling, dryness, or changes in color.
7. Neck
Examine the neck for:
- Range of motion
- Swelling
- Lymph nodes
- Tracheal position
- Visible abnormalities
Depending on the clinical situation, assessment may also include examination of the thyroid or jugular venous pressure.
8. Chest and Respiratory System
The respiratory examination evaluates breathing and the condition of the lungs.
Observe:
- Respiratory rate
- Respiratory effort
- Chest movement
- Chest symmetry
- Use of accessory muscles
- Signs of respiratory distress
Depending on the clinical assessment, healthcare professionals may use:
Inspection → Palpation → Percussion → Auscultation
Auscultation allows assessment of breath sounds using a stethoscope.
9. Cardiovascular Examination
The cardiovascular examination focuses on the heart and circulation.
Assess:
- Heart rate
- Heart rhythm
- Peripheral pulses
- Capillary refill when appropriate
- Skin temperature
- Peripheral edema
- Heart sounds when indicated
Auscultation of the heart may be performed using a stethoscope to assess heart sounds and identify possible abnormalities.
10. Abdominal Examination
The abdominal examination is generally performed systematically.
A commonly taught sequence is:
Inspection → Auscultation → Percussion → Palpation
Inspection
Look for:
- Abdominal shape
- Distension
- Scars
- Visible masses
- Skin changes
Auscultation
Listen for bowel sounds and other relevant sounds when clinically indicated.
Percussion
Percussion can provide information about underlying structures and the presence of air, fluid, or solid tissue.
Palpation
Palpation can help assess:
- Tenderness
- Guarding
- Masses
- Organ enlargement
The depth and extent of palpation should be appropriate to the clinical situation.
11. Musculoskeletal Assessment
The musculoskeletal examination evaluates movement, strength, and physical function.
Assess:
- Range of motion
- Muscle strength
- Joint movement
- Swelling
- Deformities
- Gait when appropriate
- Balance and coordination
The assessment should be adapted according to the patient’s symptoms and mobility.
12. Neurological Assessment
A basic neurological examination may include assessment of:
- Level of consciousness
- Orientation
- Speech
- Motor function
- Sensory function
- Reflexes when indicated
- Coordination
- Balance
- Cranial nerve function when appropriate
The extent of neurological examination depends on the patient’s presentation.
13. Skin Assessment
Examine the skin for:
- Color
- Temperature
- Moisture
- Texture
- Rashes
- Wounds
- Bruising
- Pressure injuries
- Swelling
For patients with limited mobility, particular attention should be given to areas at risk of pressure injury.
14. Extremities
Examine the arms and legs for:
- Symmetry
- Movement
- Muscle strength
- Swelling
- Skin changes
- Peripheral pulses
- Sensation
- Capillary refill when appropriate
Compare both sides of the body when clinically relevant.
Inspection, Palpation, Percussion, and Auscultation
Four fundamental techniques are commonly used during physical examination.
Inspection
Looking carefully at the patient and identifying visible findings.
Palpation
Using the hands to assess structures such as the skin, pulses, abdomen, lymph nodes, or joints.
Percussion
Tapping the body surface to help assess the characteristics of underlying structures.
Auscultation
Listening to body sounds, usually with a stethoscope.
These techniques are combined differently depending on the body system being examined.
Documentation of Findings
Accurate documentation is an important part of clinical assessment.
Record relevant findings clearly and objectively, including:
- Vital signs
- Positive findings
- Significant negative findings
- Patient symptoms
- Examination results
- Changes from previous assessments
Avoid vague descriptions when a more objective description is possible.
For example, instead of writing:
“Patient looks unwell.”
A more useful clinical description might document specific observable findings such as:
“Patient appears pale and is breathing rapidly.”
Documentation should follow the standards and terminology used by the healthcare institution.
When Should the Assessment Be Modified?
A complete head-to-toe assessment may not always be appropriate.
For patients with an urgent or life-threatening problem, immediate priorities come first.
For example, if a patient has severe breathing difficulty, the healthcare professional should prioritize airway, breathing, and circulation rather than delaying urgent care to complete a routine head-to-toe examination.
The assessment should therefore be adapted to:
- Patient condition
- Presenting complaint
- Age
- Clinical setting
- Level of consciousness
- Emergency status
- Relevant medical history
Tips for Medical and Nursing Students
1. Follow a Consistent Sequence
Using the same general sequence helps reduce the chance of missing important findings.
2. Practice With a Partner
Practice examination techniques under appropriate supervision.
3. Learn Normal Findings First
Understanding what is normal makes it easier to recognize abnormalities.
4. Communicate With the Patient
Explain what you are doing and observe the patient’s response throughout the examination.
5. Document Immediately
Record important findings accurately according to your clinical documentation requirements.
Conclusion
A head-to-toe assessment provides a structured approach to evaluating a patient’s overall condition.
By systematically assessing the general appearance, vital signs, head, eyes, ears, neck, respiratory system, cardiovascular system, abdomen, neurological system, musculoskeletal system, skin, and extremities, healthcare students can develop a strong foundation in clinical examination.
The key is to combine a systematic approach with good communication, appropriate examination techniques, accurate documentation, and clinical judgment.
A structured examination helps healthcare professionals recognize changes early and provide appropriate patient care.
Leave a Reply